A Step-by-Step Guide to Implementing Usage-Based Pricing with Stripe
How to Set Up Hybrid Usage-Based Pricing with Stripe: A Practical Guide to Combining Credit Burndown and Pay-As-You-Go Models

Oct 4, 2024
Last week, I discussed the rise of usage-based pricing and how to navigate the various types of usage-based pricing models you can adopt.
This week, we're shifting to a more practical focus. We’ll walk through setting up Stripe to implement your usage-based pricing. This article will be more technical than usual, but don’t worry—you won’t need to know how to code to follow along and understand the key concepts.
As an example, I’ll use TextRequest—which I previously mentioned as an example of a SaaS leveraging a hybrid pricing model, combining credit-burndown and pay-as-you-go approaches—to illustrate these points in action.
If you are not familiar with those two pricing models, you can refer to the article mentioned above.
Why such a focus on Stripe for usage-based billing?
Stripe is the go-to payment service provider (PSP) when you're launching a SaaS business and need to start collecting payments from your customers.
Despite the rise of new-generation billing tools specializing in usage-based pricing—such as Metronome, Lago, or Orb—it often makes sense to start with Stripe Billing for your initial setup. These newer tools typically require more setup time and resources, which you may not have when just starting out.
For businesses with a low MRR, it’s often more cost-effective to use Stripe Billing rather than a specialized product. To estimate Stripe’s fees based on your customer base and MRR, you can use this Stripe fee calculator by Lago.
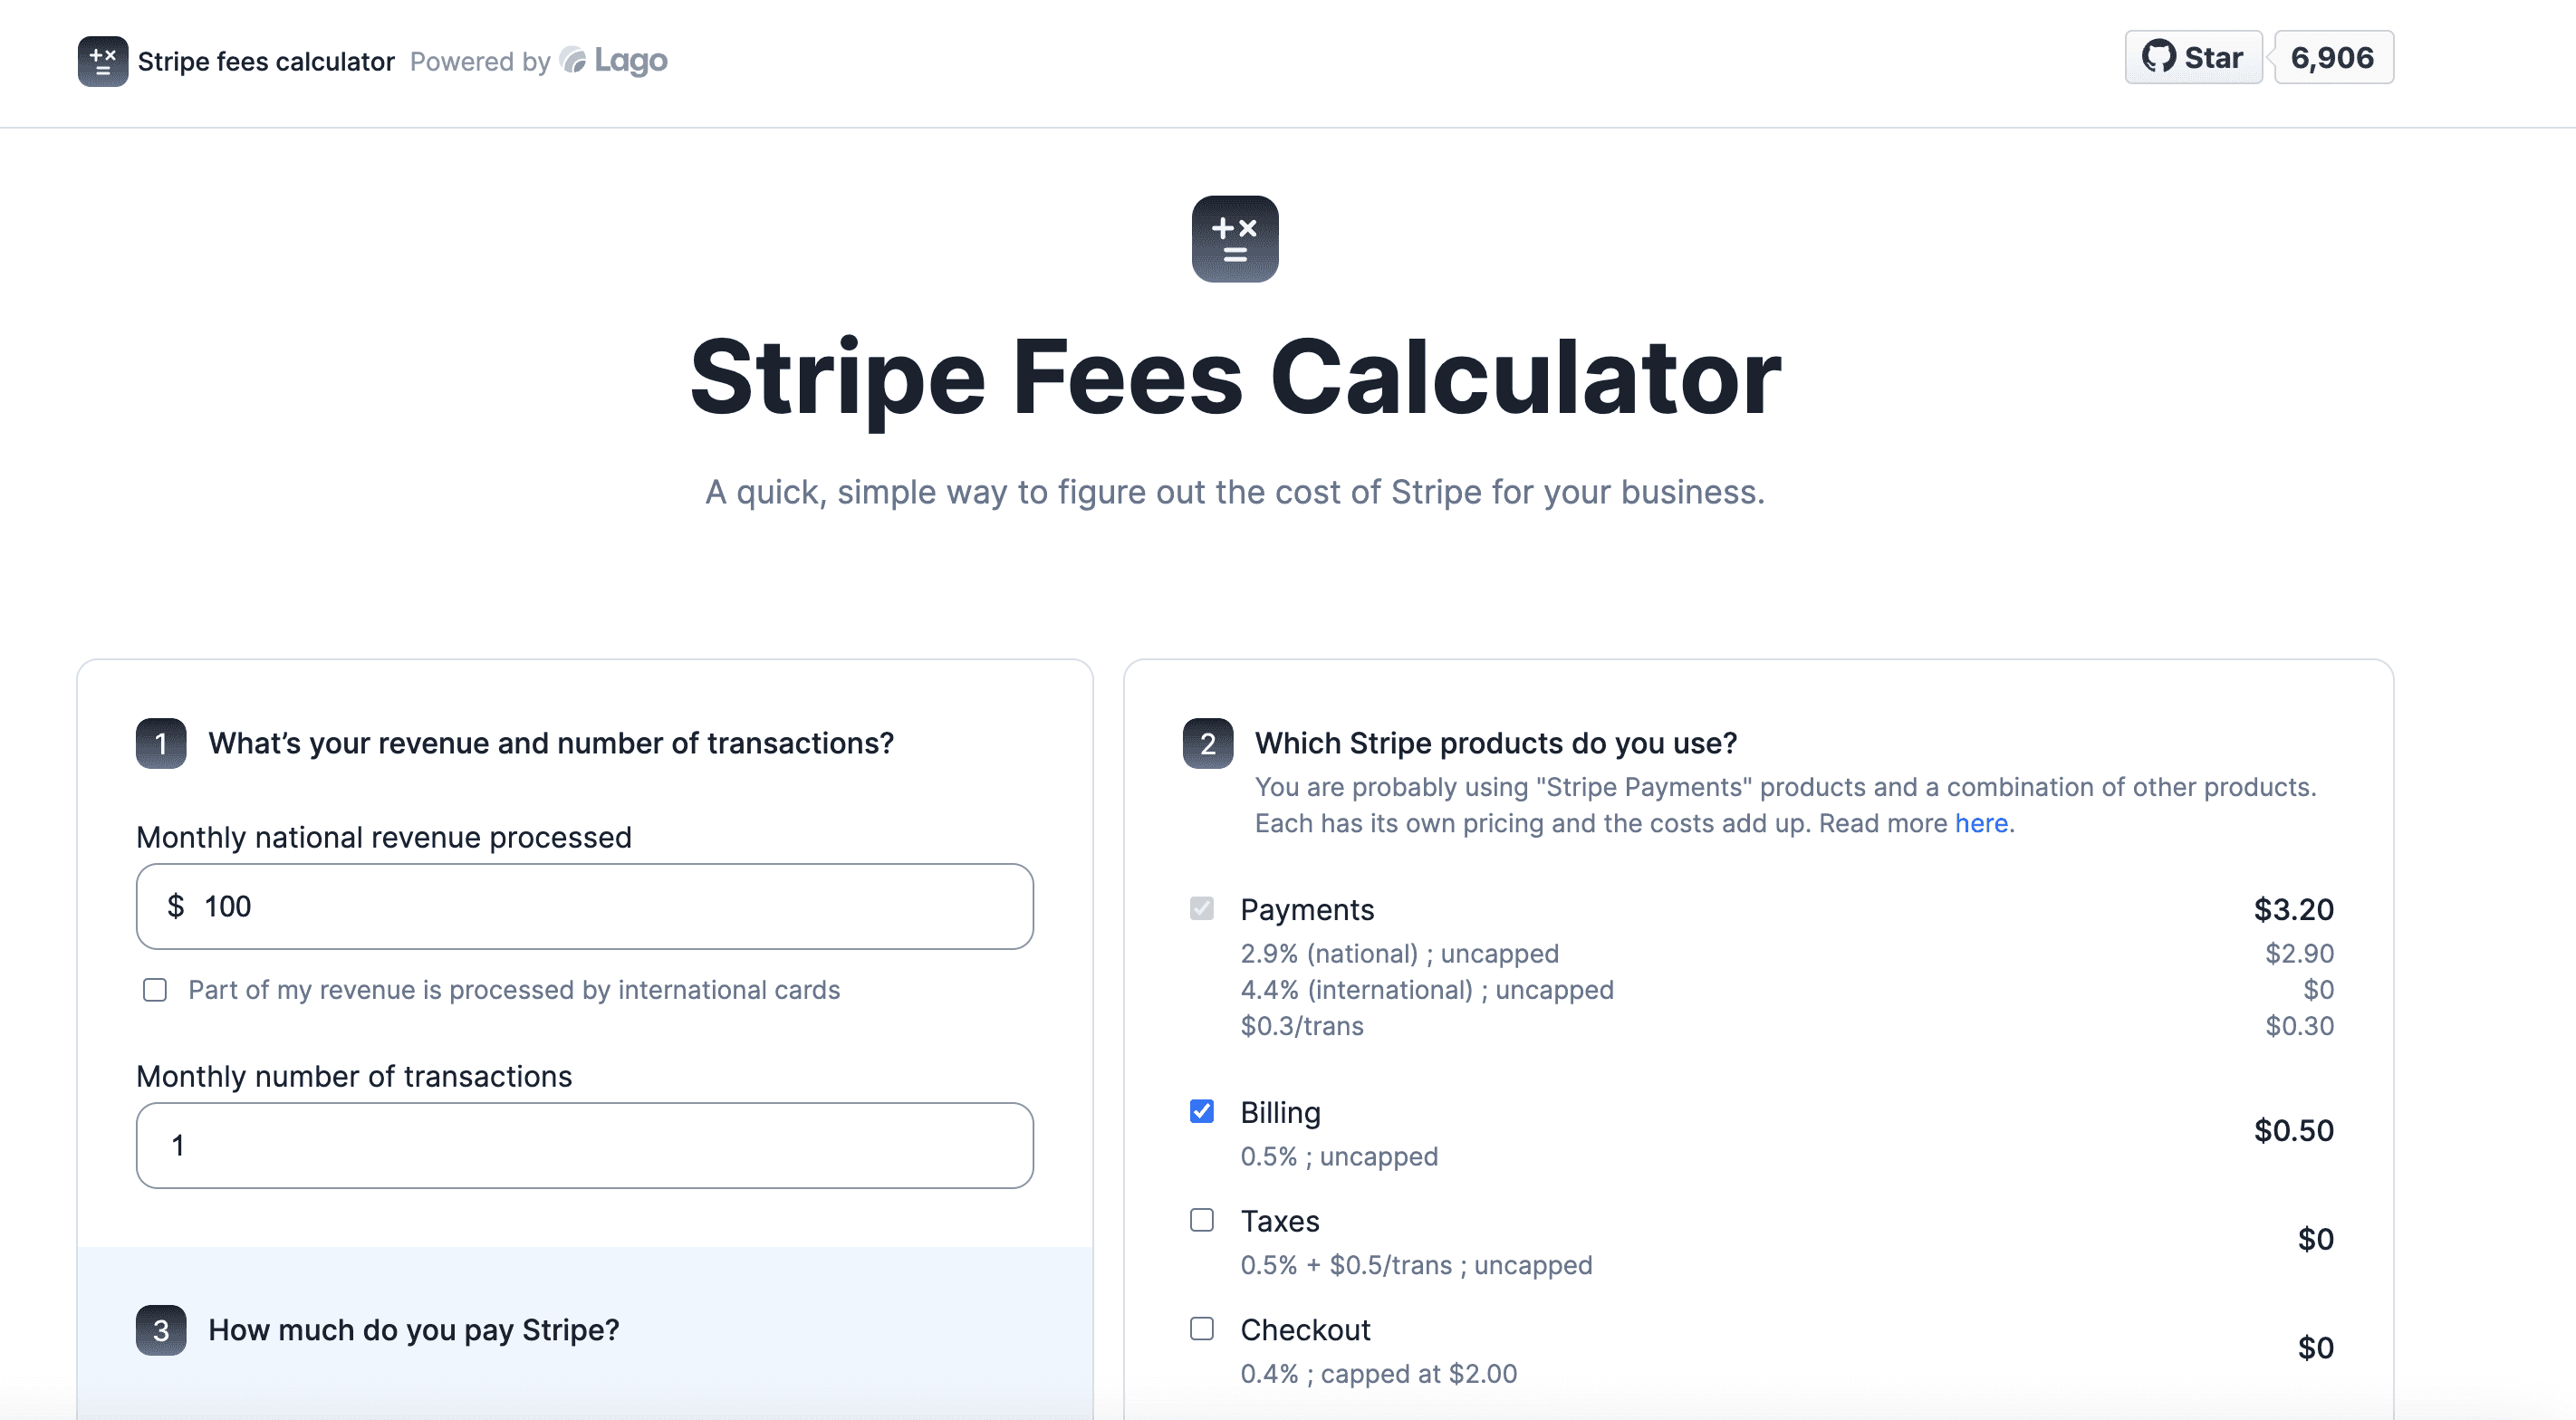
A Stripe Fees Calculator (made by Lago)
As a result, in many cases, the safer and more practical approach is to integrate with Stripe Billing first.
It’s also worth noting that while Stripe offers flexibility, it doesn’t natively support all usage-based pricing models, including credit-burndown (or “credit-based”) models. Stripe has acknowledged this, stating that their support for these models is still in beta, and they are seeking beta testers.
This means that if you want to implement a proper credit-burndown or credit-based pricing model, you’ll need to do some work to adapt to Stripe's current native offerings.
I’m going to outline the steps to follow in the next paragraph.
Implementation steps
Textrequest offers pricing tiers defined by two parameters:
credit allocation (the “credit burndown” part of the pricing model): a specific number of allocated texts is granted each month. For example, the Starter plan at 139$ offers a credit of 2500 texts
additional credits when you reach your limit of credit allocation (the “pay as you go” part of the hybrid model): when you reach your limit of credits allocated within your plans, you can either upgrade to a higher plan (the “Corporate” plan), or decide to pay additional texts. For example, in the wake of the Starter plan, you get to pay 0.05$ per additional texts.
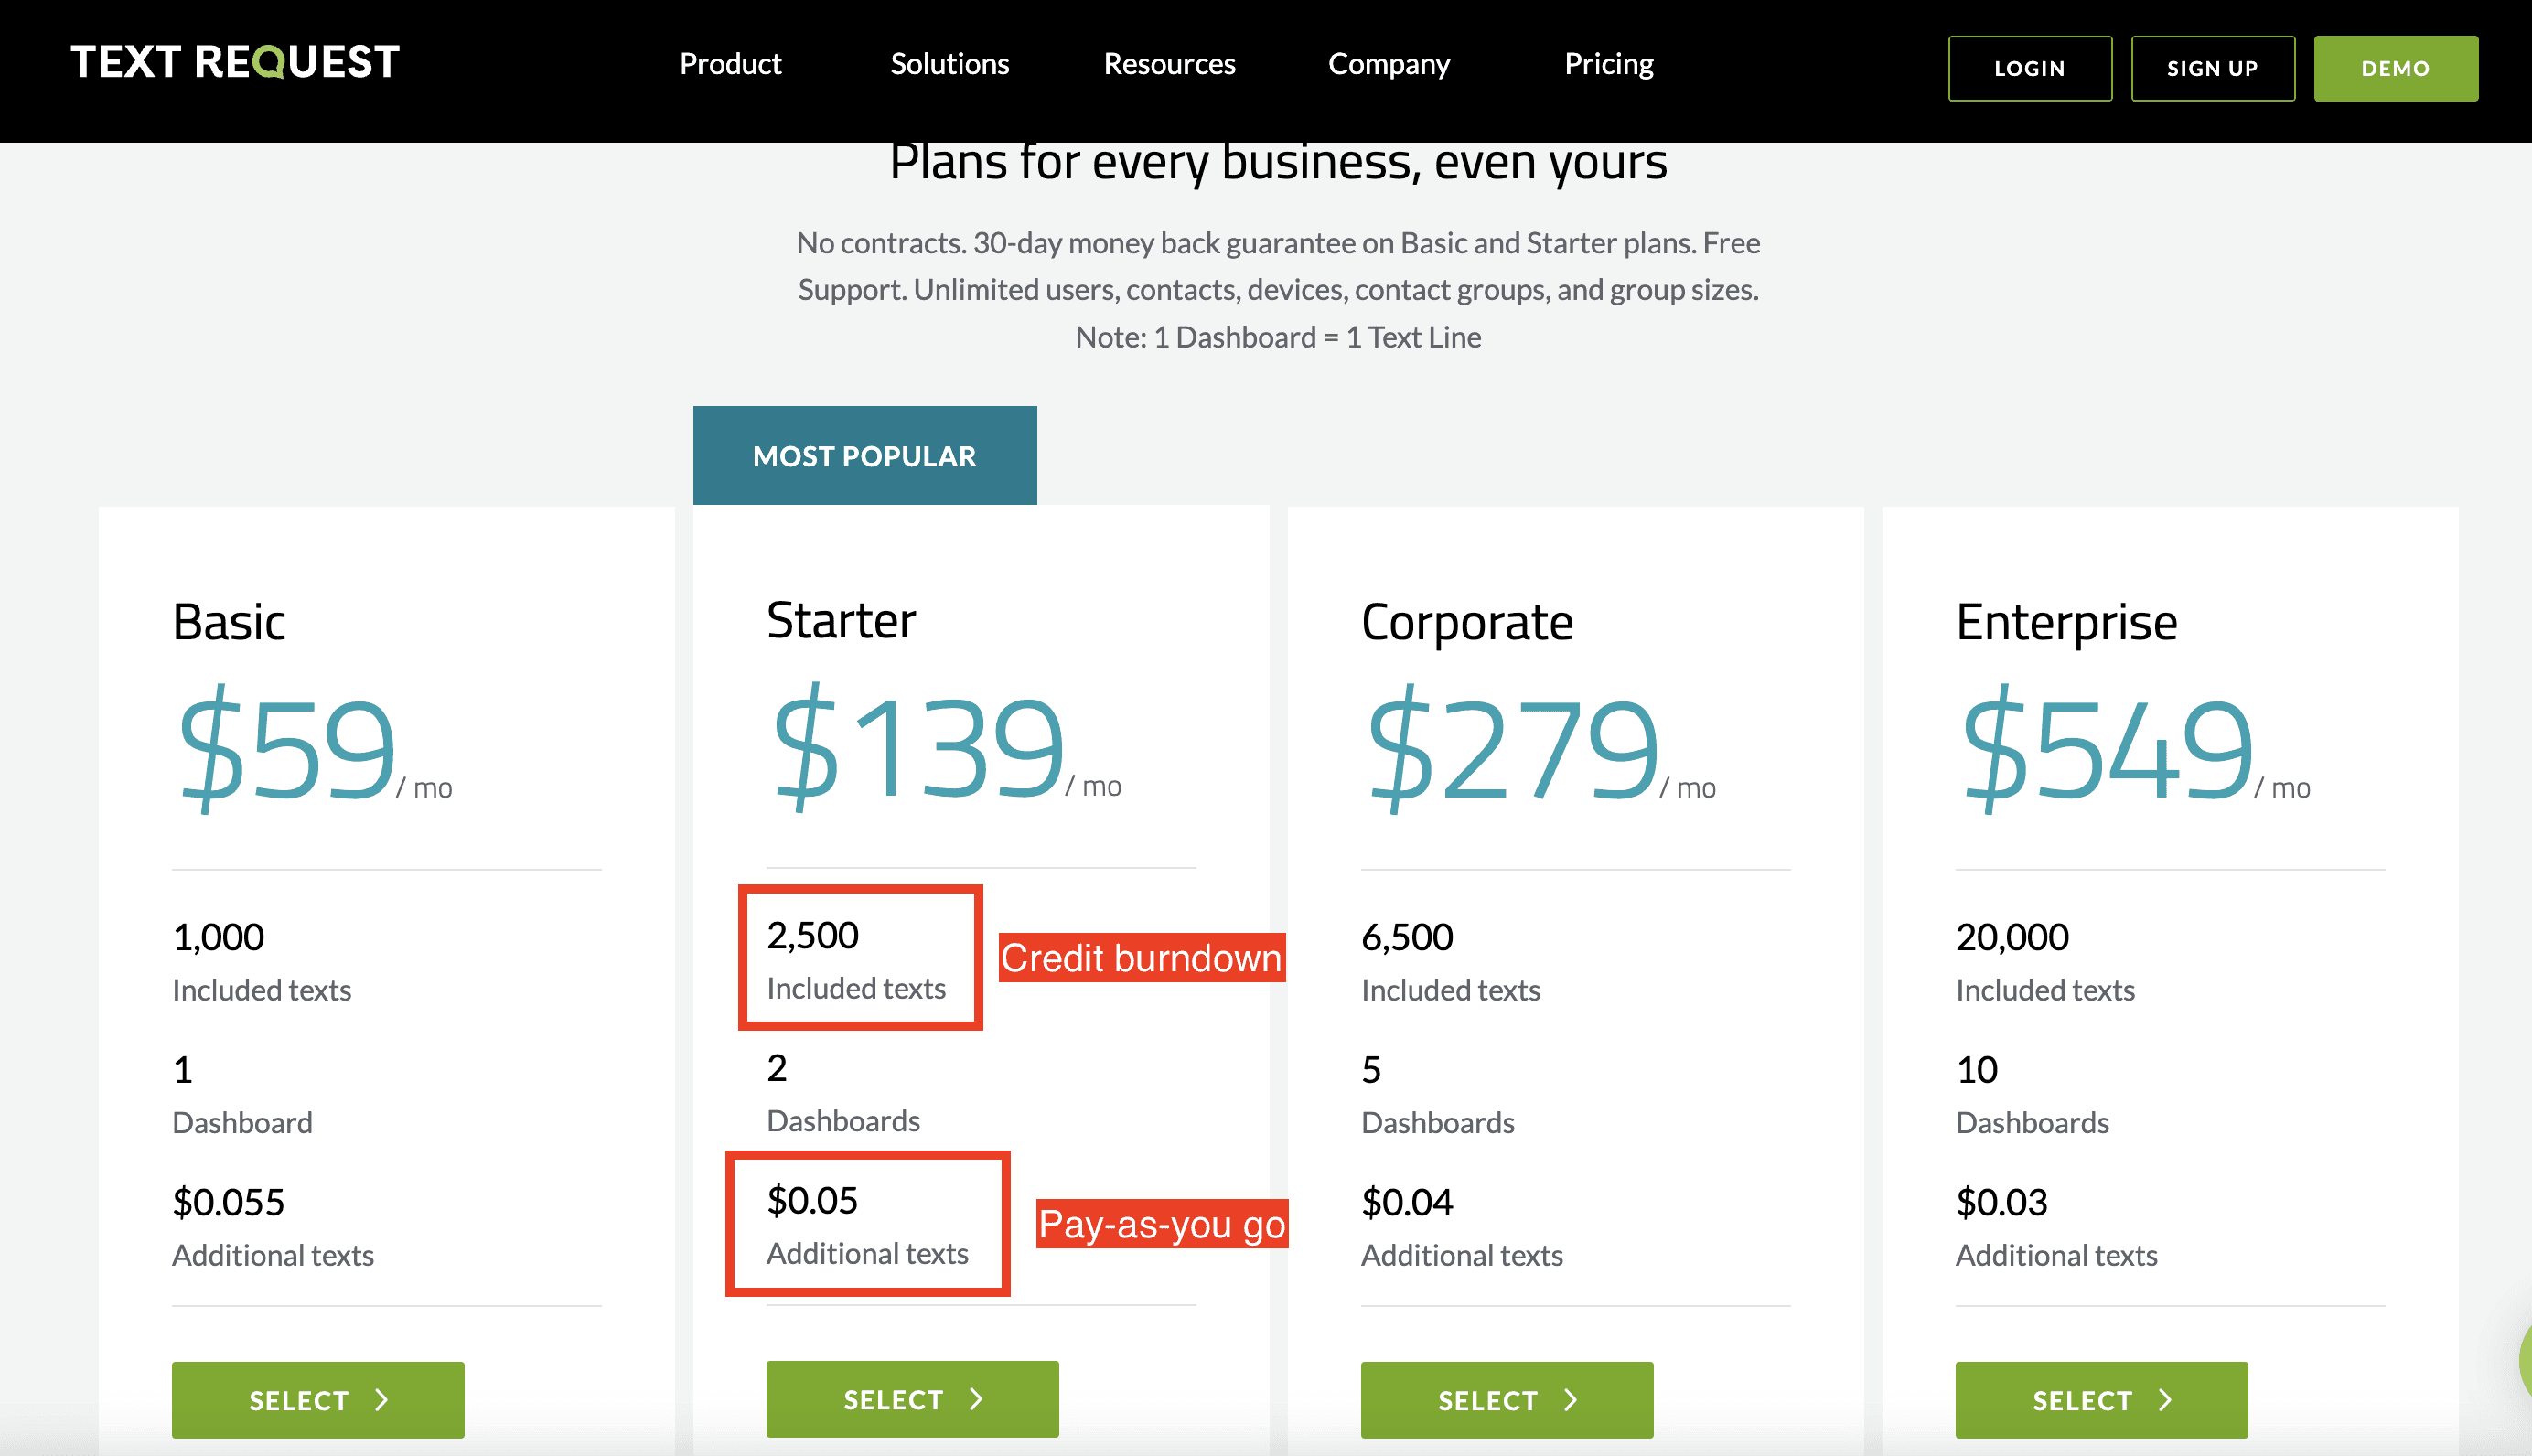
TextRequest's pricing page
Let’s see how to implement such a pricing model with Stripe.
Credit allocation per plan
Here are the steps you’re going to have to go through:
[No-code] Creating and setting-up your plans inside Stripe
[Code] Track usage within your app
[Code] Perform the aggregation to measure the number of credits
[Code] Implement the counter of burndown credits
[Code] Implement alerting emails and banners based on the counter of burndown credits
1. Implementing your plans inside Stripe
Textrequests has 4 plans. Let’s assume they have only 1 currency. These 4 plans will correspond to 4 products in Stripe (see below).
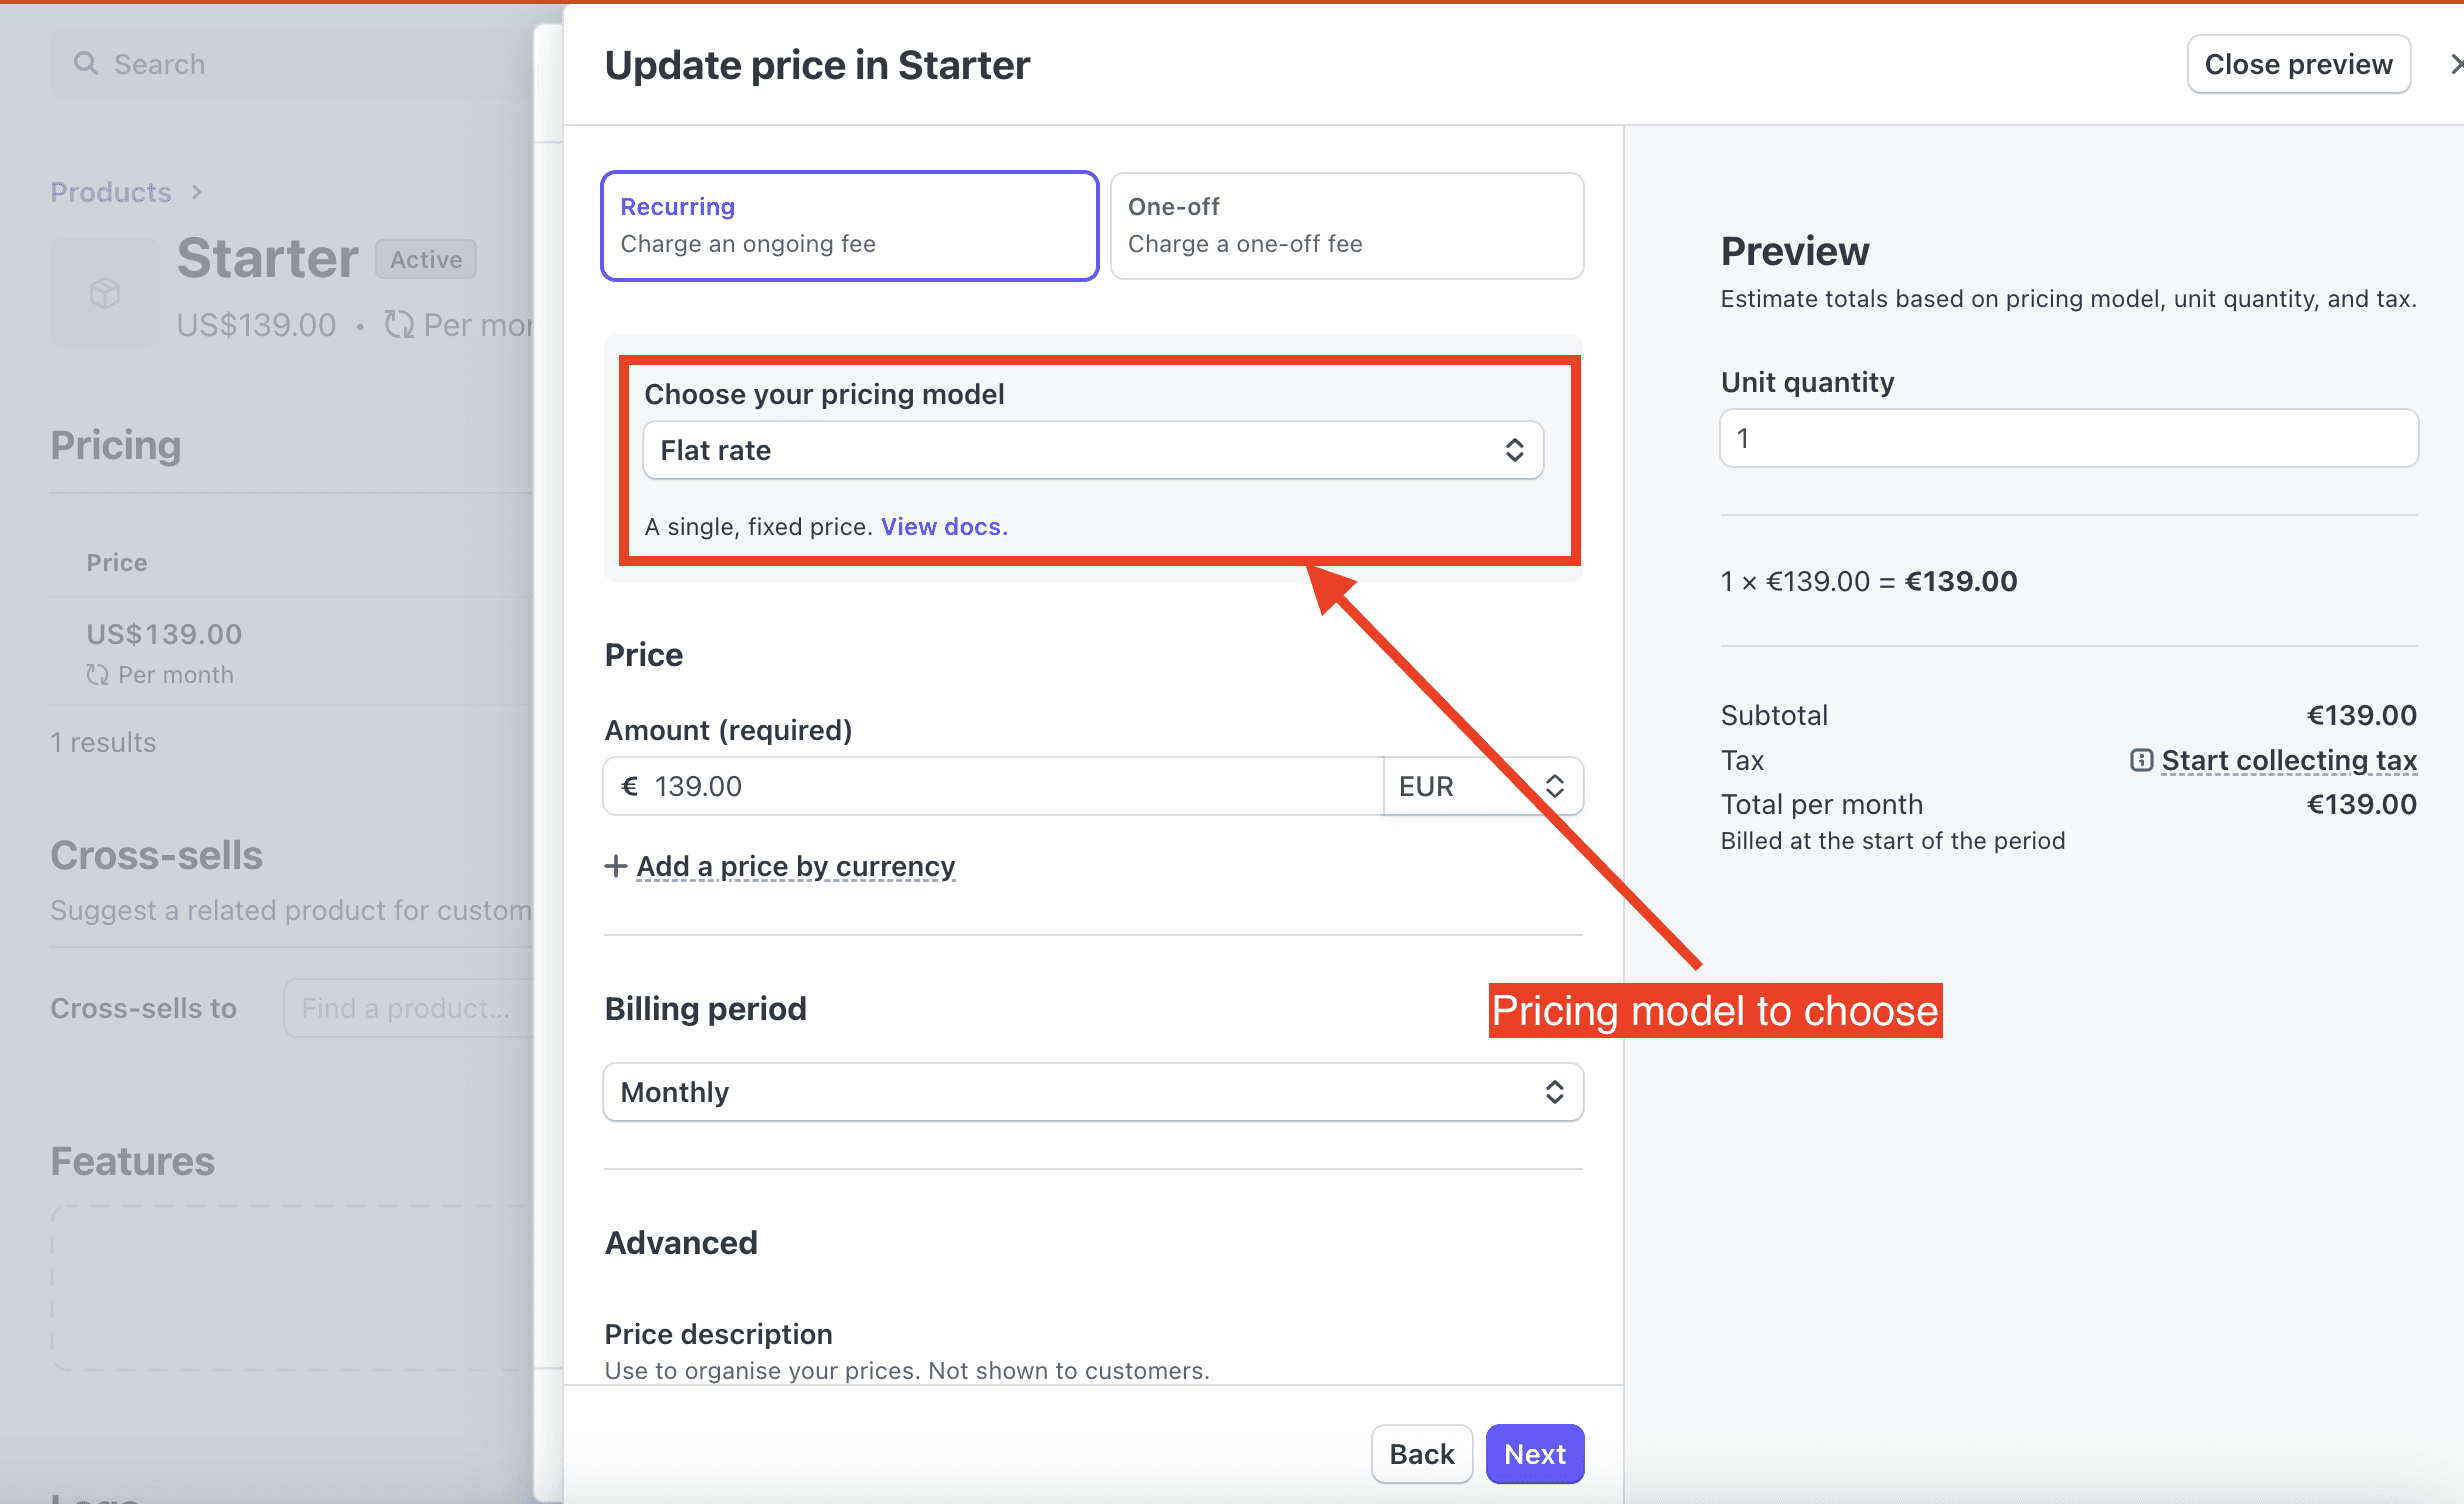
The type of product to create in Stripe
For each product, you need to set up metadata that corresponds to the allocated number of credits for each plan. It's important to configure this metadata directly within Stripe, rather than in your code. This approach gives you more flexibility—if you want to update the number of allocated credits for a plan, you can easily do so within Stripe without needing to modify the code.
You'll also need to use a Stripe webhook to "listen" for changes to this metadata and integrate the value into the logic of your code.
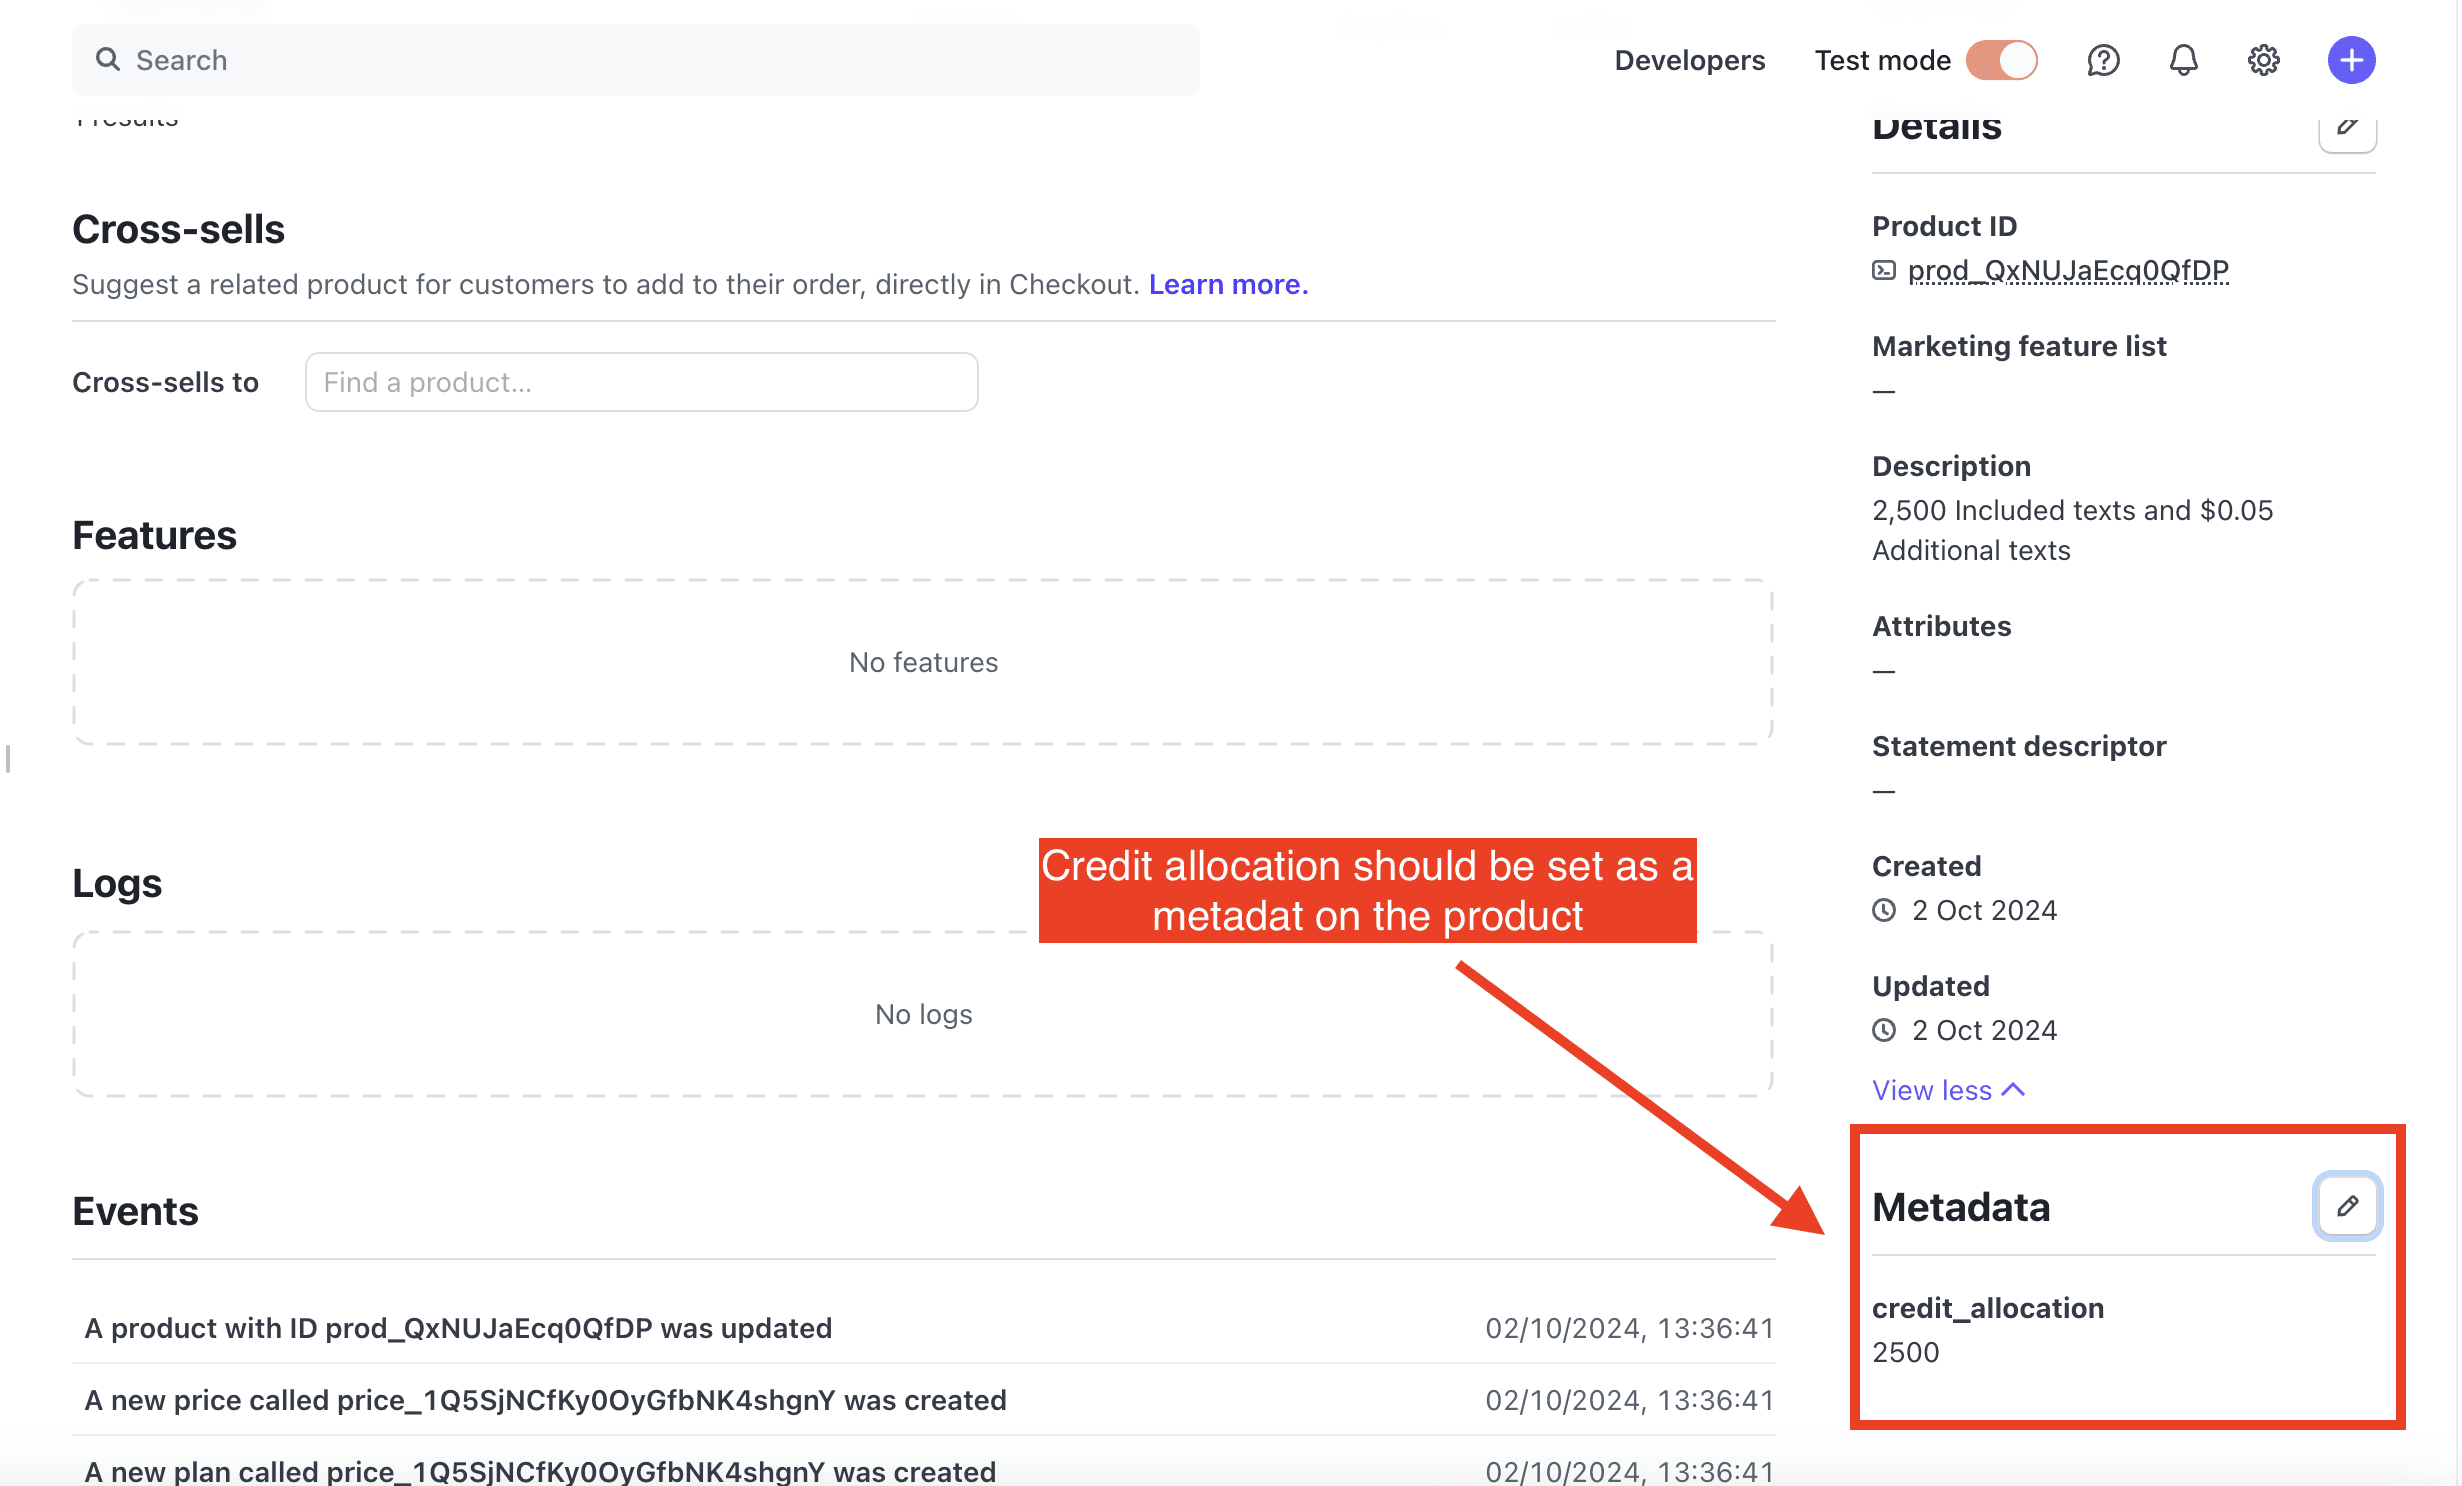
The limit for each plan should be defined by a metadata on the product
2. Track usage within your app
Generally, tracking should occur within the database. For instance, TextRequest likely has a database where they store all generated texts, each linked to a customer_id.
In their case, tracking usage was probably implemented from the start since it’s integral to their product.
For other businesses, this might require adding a new table. It’s essential to include the customer_id so you can aggregate data for each customer.
Alternatively, tracking can be done using event tracking tools like Segment or PostHog. While this might be quicker to implement, a key drawback is that the data is stored in an external tool—at least until you have a data warehouse connected.
3. [Code] Perform the aggregation to measure the credits
The aggregation is what allows you to compute the number of credits. In the case of TextRequest, this would be the total number of texts stored in the database for each customer_id during a given month.
In other cases, the process might be more complex, such as calculating the number of unique values, determining the maximum value from a list, or other specific measurements depending on the usage criteria.
4. [Code] Implement the counter of burndown credits
With this setup, TextRequest can now track the number of texts consumed by each customer every month.
Next, they need to calculate the burndown of credits for each month. To do this, they’ll subtract the number of texts consumed by each customer from the credit limit (also known as credit allocation) defined in their plan. This limit is the credit_allocation metadata you’ve configured in Stripe.
To retrieve this value, ask one of your developers to use the following Stripe API endpoint.
The burndown value should be stored in your database, both for historical tracking and because you’ll need the current value to trigger various alerts (as described in the next step).
P.S: This highlights the advantage of setting the credit limit as metadata in Stripe. If you ever need to modify the plan or make exceptions for specific customers (such as offering additional credits), you can simply update the value in Stripe without requiring changes from your developers. As long as the burndown calculation is set up correctly, the new value will automatically take effect for the current month.
5. [Code] Implement the counter of burndown credits
You now have the live number of remaining credits for each customer.
With this information, you can implement workflows such as email notifications and in-app banners to ensure customers are alerted when they approach the limits of their plans.
For example, at Livestorm, we would send an email to the account admin when they reached 50% of their burndown credits. Additionally, a red banner would appear when they hit 80% of their credits.
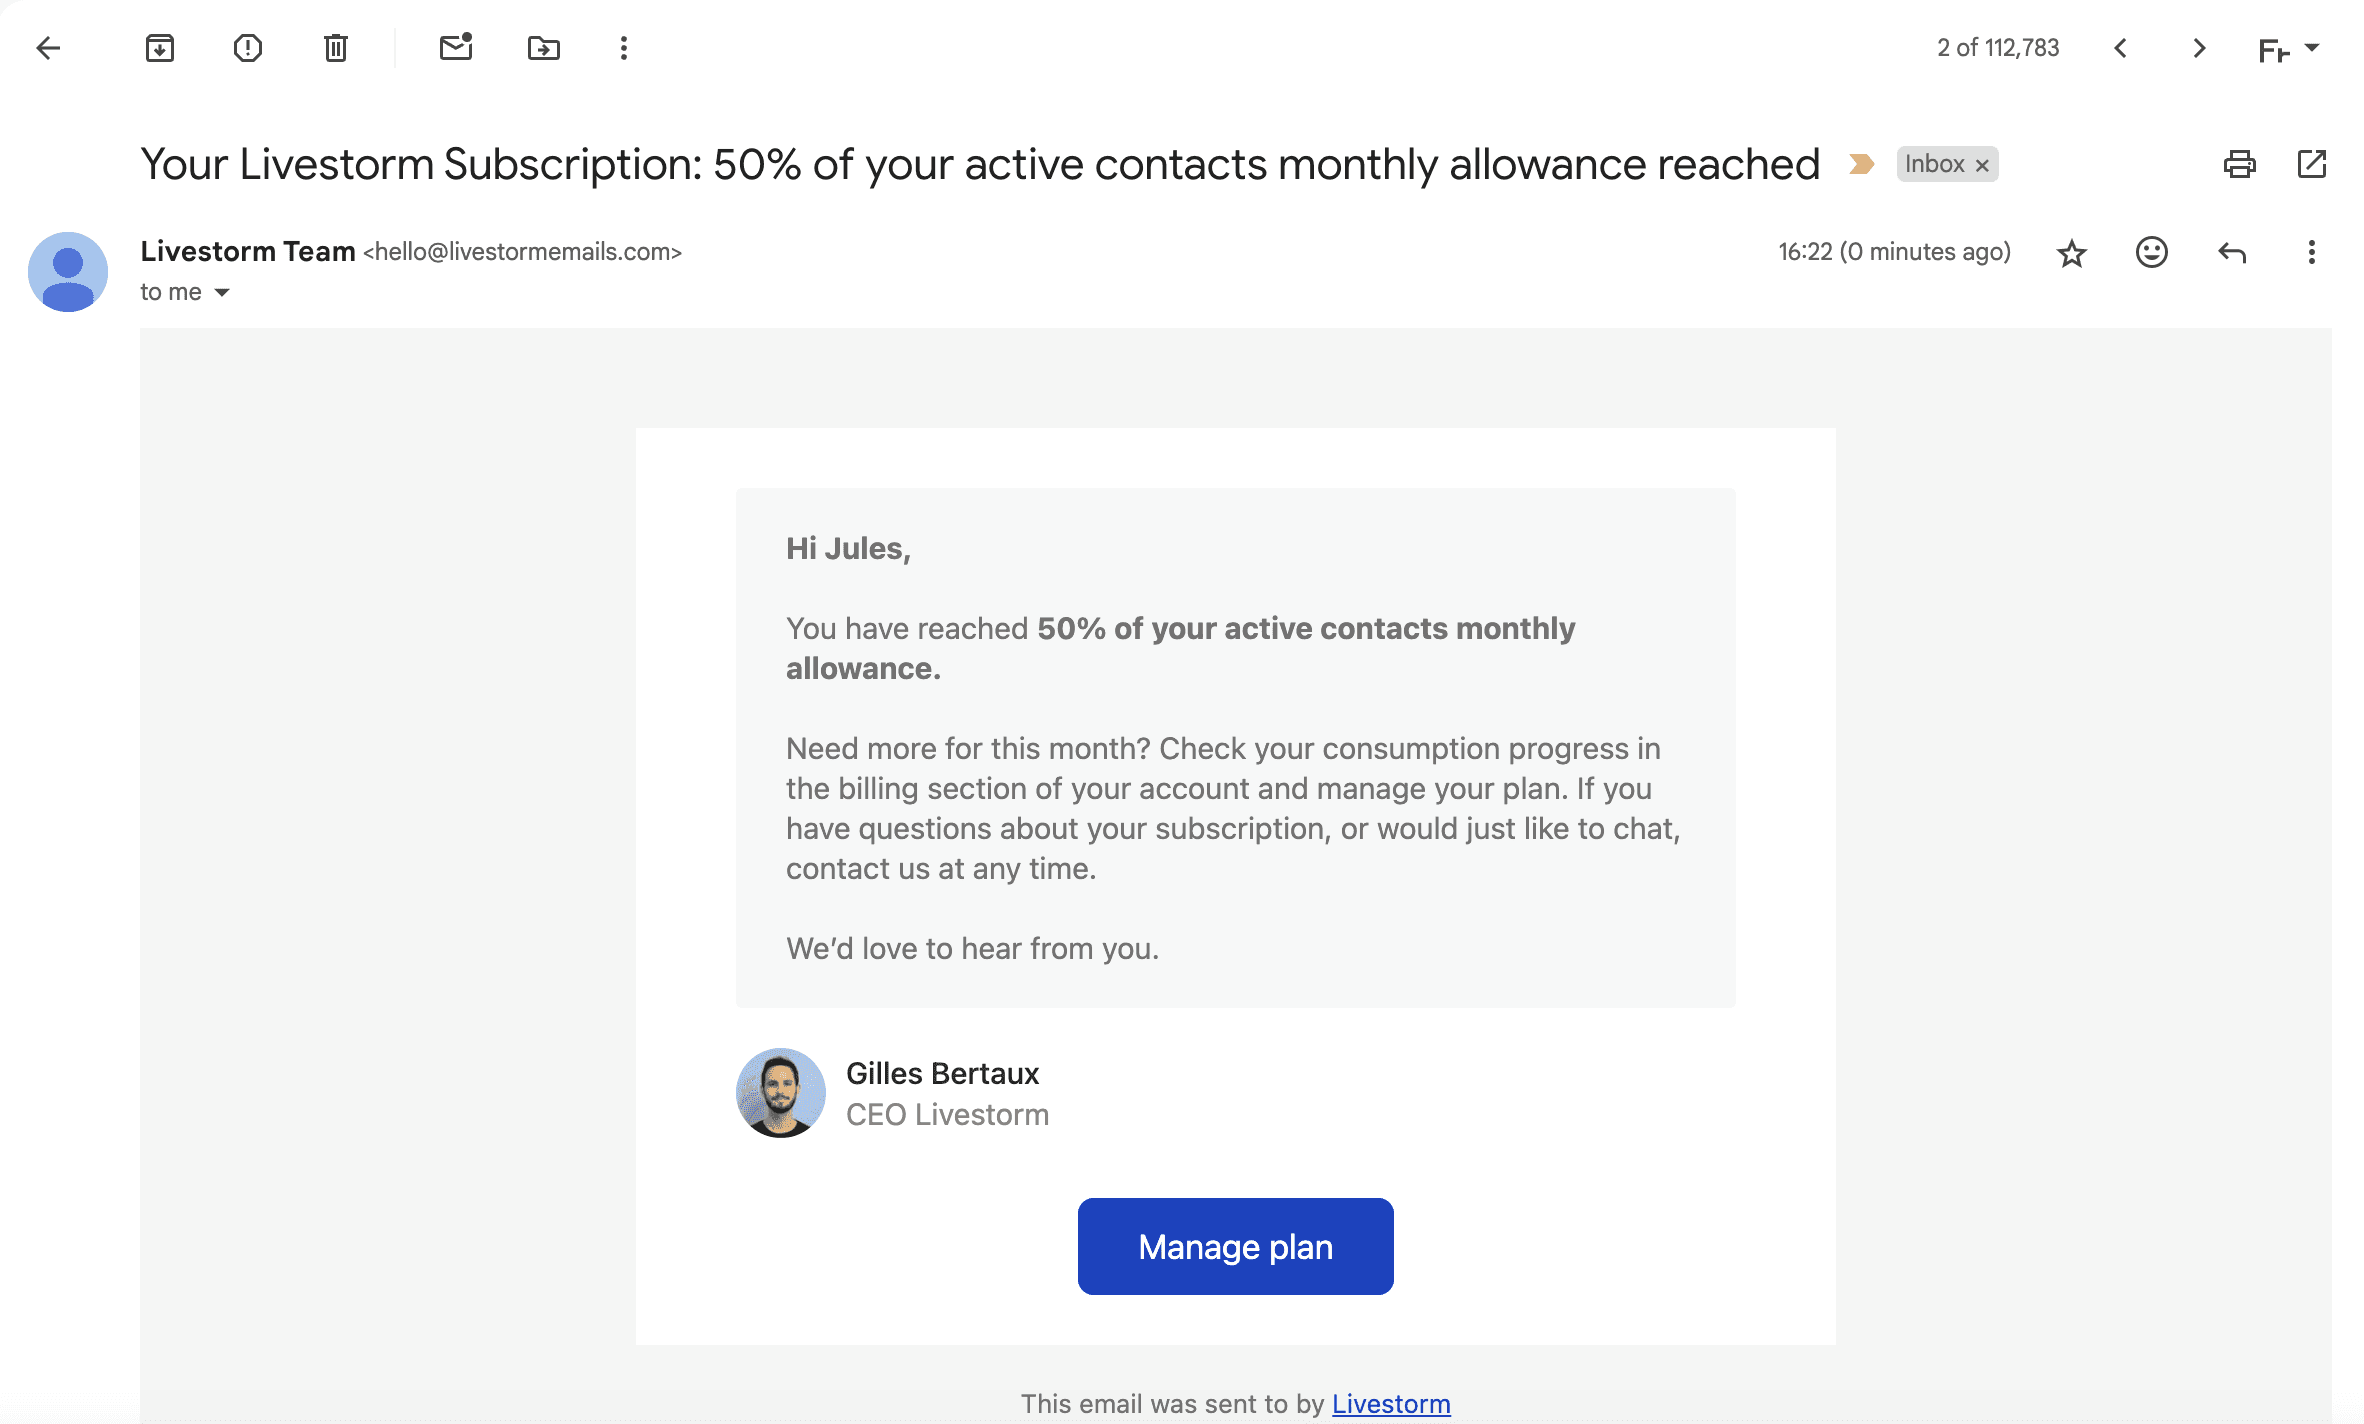
An example of alerting emails you can send your customers when they reach certain thresholds of consumption
You can also add a dashboard to make it easier for your customers to track their consumption.
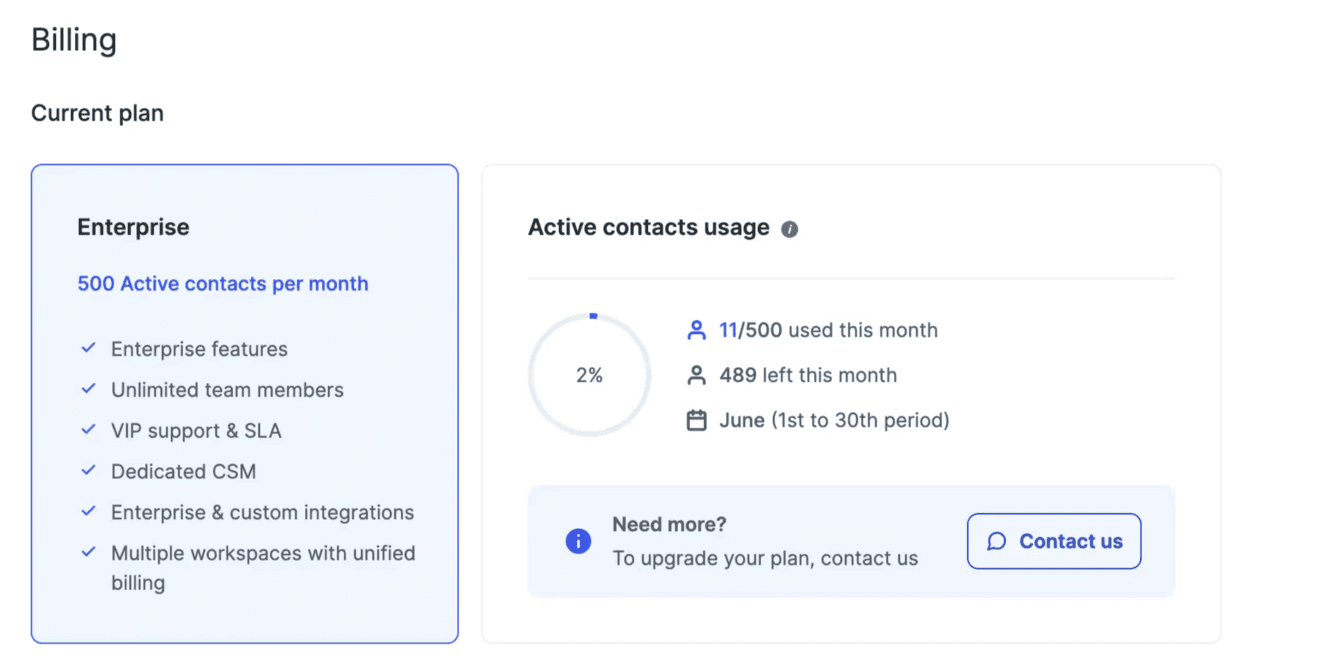
Even more importantly, you can now block usage once a customer has used 100% of their credits, and display a CTA prompting them to upgrade their plan or purchase additional credits.
Additional credits
For the additional credits, you’ll need to follow two steps:
[No-code] Creating and setting-up plans inside Stripe
[Code] Connecting additional usage to pay-as-you-go plans
Creating and setting-up plans inside Stripe
TextRequest enables you to pay additional text credits when you reach the limit of credits on your plans.
This will number of additional credits can be billed via a dedicated plan. Opt for a usage-based, and price per unit plan.
This time no need to set-up some metadata.
Here the aim will be to send additional credits to this plan so that it computes the additional amount.
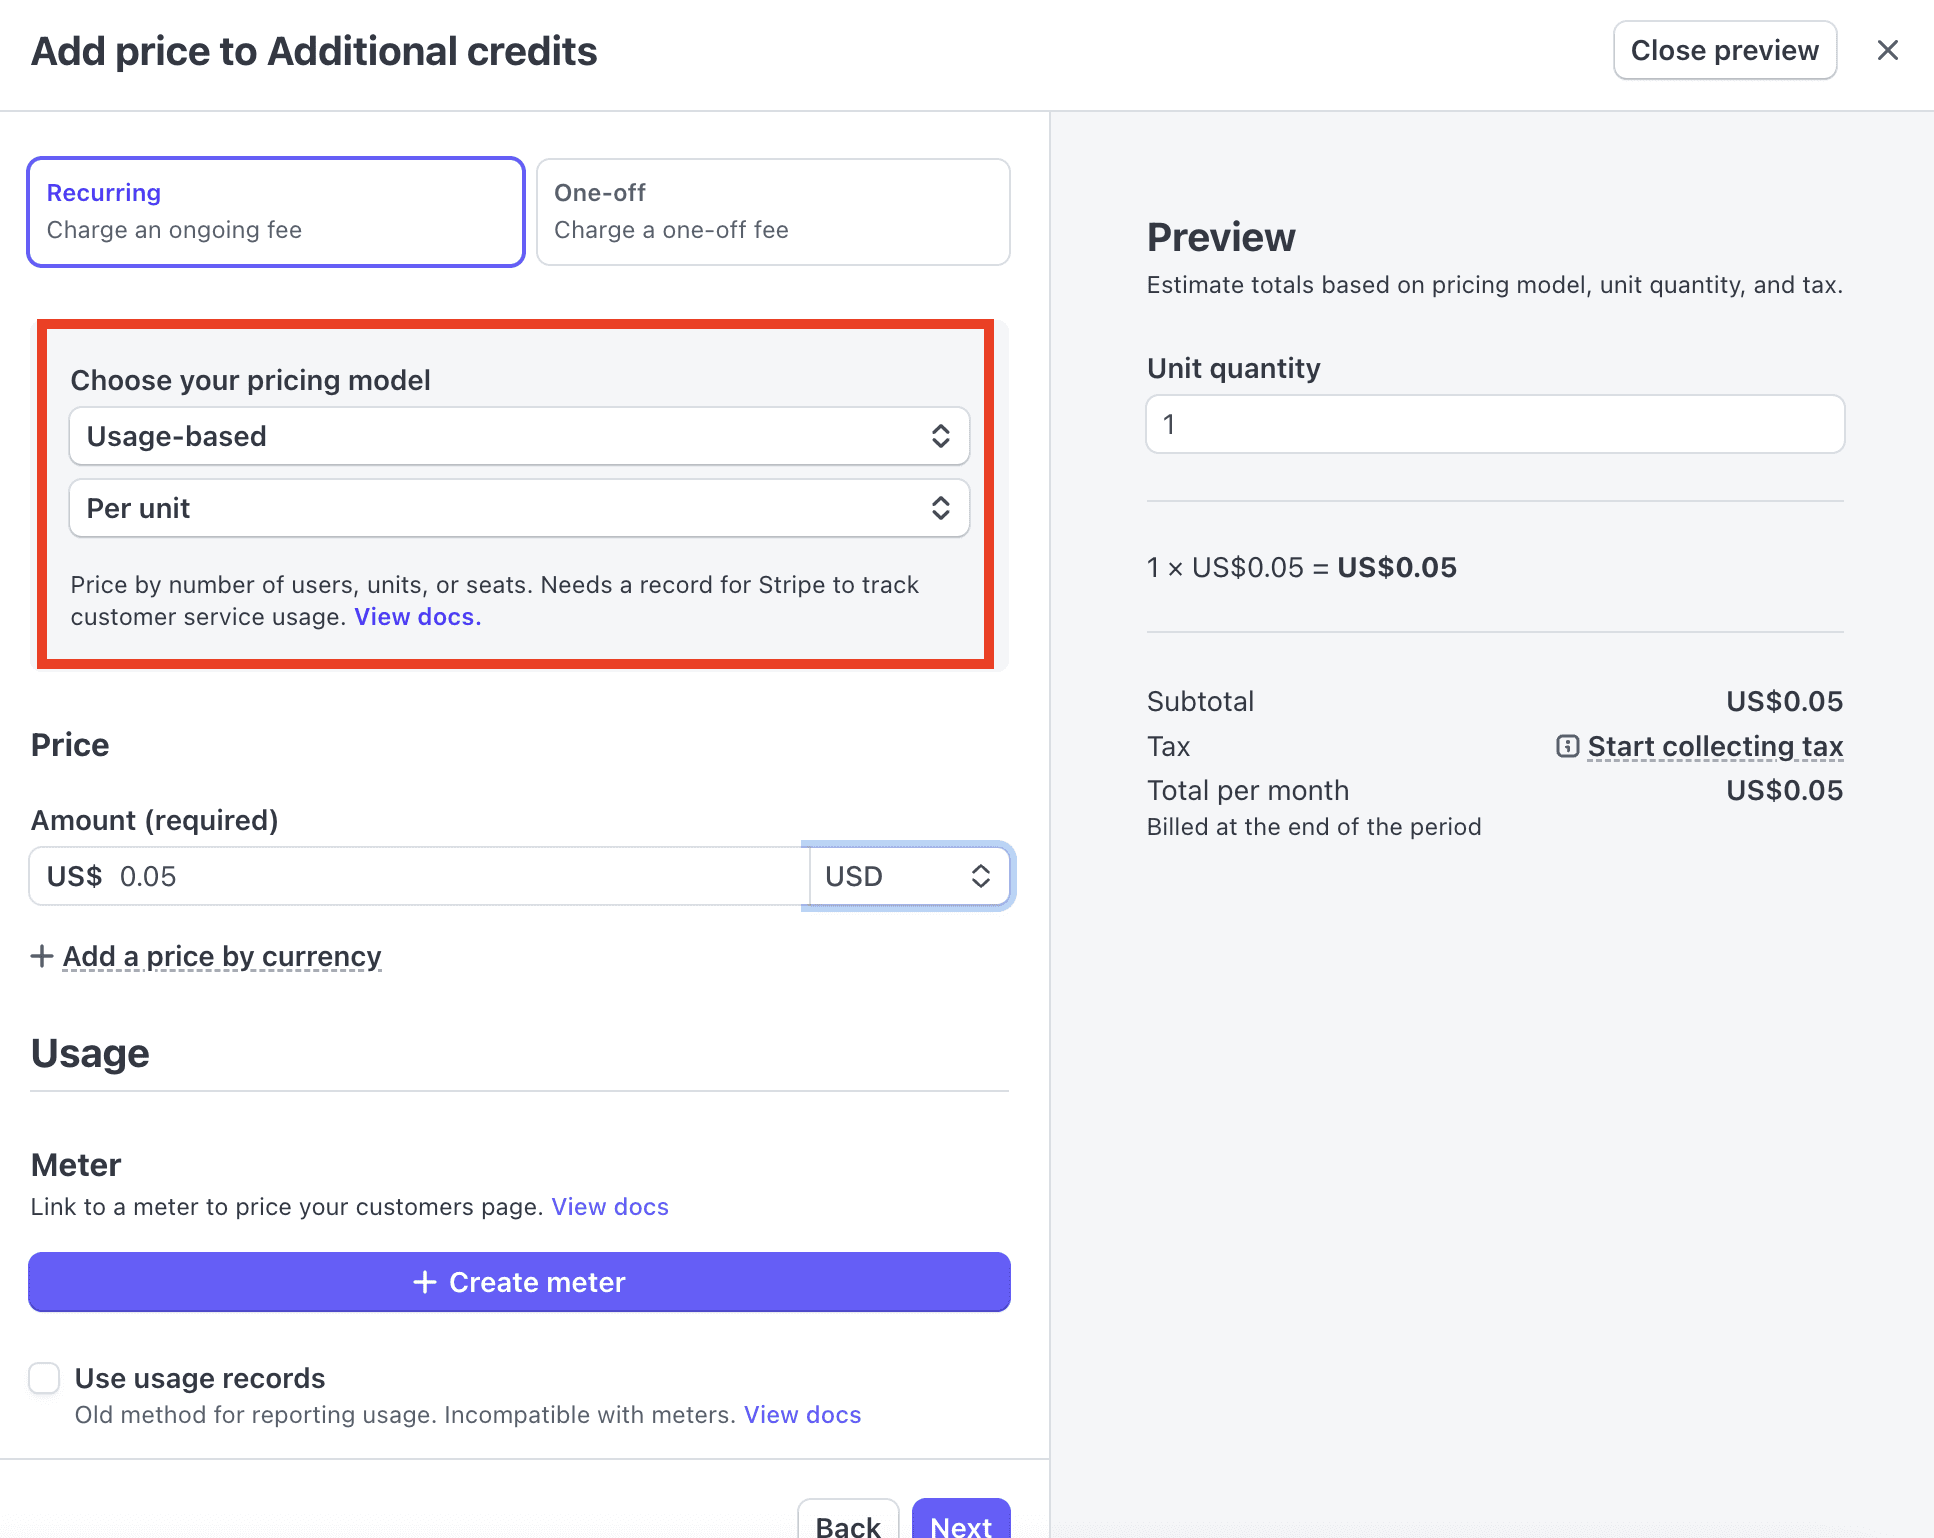
Product to add to Stripe to handle the billing of additional credits
Connecting additional usage to pay-as-you-go plans
Additional credits are used once customers exceed their plan’s limit. Technically, you can flag these credits in your database to track them separately from standard credits. This ensures you can easily aggregate the number of additional credits consumed.
Keeping the computation of additional credits distinct from standard credits will also simplify displaying this information on the customer dashboard.
Most importantly, this distinction is required to send the additional credit usage to Stripe at the end of the billing period. By using this Stripe API endpoint, you can bill customers for the extra credits consumed during the period.
Vibe Coding your Stripe usage-based billing implementation
Until recently, building these kinds of workflows required developer resources. But a new trend called vibe coding has made it significantly easier to build them—without being a developer.
With vibe coding, all you need is a clear understanding of the workflows you want to create and the API endpoints you plan to use. Tools like Cursor and Lovable enable you to build fully functional billing workflows in a fraction of the time.
If you want to become self-sufficient in building usage-based billing architecture, consider taking a course like those offered by Vibe Coding Academy.
Conclusion
Here are the main steps to implement a hybrid usage-based pricing model with Stripe, combining credit burndown and pay-as-you-go. While these are the core steps, other technical challenges may arise depending on your product and technical requirements.
Please note, this article outlines the technical implementation with Stripe as of today (03/10/24). Stripe has announced plans to natively support these pricing models, especially following their acquisition of the next-generation billing software, Octane.
In the future, you’ll only need to send usage data to Stripe, and you'll be able to configure the rest without writing any additional code.
In the meantime, there are other solutions specifically designed for usage-based billing, such as Metronome, Lago, Orb, and Hyperline.
